React 组件,从概念上类似于 JavaScript 函数。它接受任意的入参(即 “props”),并返回用于描述页面展示内容的 React 元素。
React 组件分为两类,class 组件和函数组件。hooks 的出现让函数组件拥有了状态(state), 因此让自定义 hook 成为了继 render-props 和高阶组件(HOC)之后的第三种状态共享方案。
class 组件的状态共享
render-props
具有 render prop 的组件接受一个函数,该函数返回一个 React 元素并调用它(回调函数)而不是实现自己的渲染逻辑。
react 官网示例:
 1
 2
 3
 4
 5
 6
 7
 8
 9
10
11
12
13
14
15
16
17
18
19
20
21
22
23
24
25
26
27
28
29
30
31
32
33
34
35
36
37
38
39
40
41
42
43
44
45
46
47
class Cat extends React . Component {
render () {
const mouse = this . props . mouse ;
return (
< img
src = "/cat.jpg"
style = {{ position : "absolute" , left : mouse . x , top : mouse . y }}
/>
);
}
}
class Mouse extends React . Component {
constructor ( props ) {
super ( props );
this . handleMouseMove = this . handleMouseMove . bind ( this );
this . state = { x : 0 , y : 0 };
}
handleMouseMove ( event ) {
this . setState ({
x : event . clientX ,
y : event . clientY ,
});
}
render () {
return (
< div style = {{ height : "100vh" }} onMouseMove = { this . handleMouseMove }>
{ /*使用`render`属性来动态确定要渲染的内容。*/ }
{ this . props . render ( this . state )}
</ div >
);
}
}
class MouseTracker extends React . Component {
render () {
return (
< div >
< h1 > 移动鼠标 ! </ h1 >
{ /*将 Mouse 组件中的 state 传递给 Cat 组件*/ }
< Mouse render = {( mouse ) => < Cat mouse = { mouse } />} />
</ div >
);
}
}
注意 Mouse 组件中的 this.props.render 是绑定在标签模板上的 render(外部传入)。这样就实现了鼠标位置状态的共享, Cat 组件能够根据鼠标位置动态移动 cat 图片。这个示例实现了 react 组件的理想状态:有状态的组件无渲染,有渲染的组件无状态。 因为 Cat 组件只是一个渲染模板,它也可以替换成如下的函数组件:
1
2
3
4
5
6
7
const Cat = ( props ) => {
const mouse = this . props . mouse ;
return (
< img src = "/cat.jpg" style = {{ position : 'absolute' , left : mouse . x , top : mouse . y }} />
);
}
}
UI 与状态分离,便于逻辑的复用。
高阶组件(HOC)
高阶组件是参数为组件,返回值为新组件的函数,高阶组件是函数。
1
const EnhancedComponent = higherOrderComponent ( WrappedComponent );
示例:
 1
 2
 3
 4
 5
 6
 7
 8
 9
10
11
12
13
14
15
16
17
18
19
20
21
22
23
24
25
26
27
28
29
30
31
32
33
34
35
36
37
38
function high ( WrappedComponent ){
return class extends React . Component {
constructor (){
this . state = {
open : false
}
}
componentDidMount (){
console . log ( 'haha' )
}
change = ()=>{
this . setState (( state )=>{ //用到state需要使用回调函数修改state的值
return { open :! state . open }
})
}
render (){
//使用新数据渲染被包装的组件
return < WrappedComponent open = { this . state . open } change = { this . change } />
}
}
}
class ToggleButton extends Component { //不带有自身的状态能够实现组件的复用
constructor ( props ){
super ( props )
}
render (){
let { open , change } = this . props ; // 来自 high 的数据
return < Fragment >
< button type = "primary" onClick = { change }>
toggle Modal
</ button >
< div >{ open }</ div > //拿到open值
</ Fragment >
}
}
// high 是一个高阶组件,传入组件作为参数,组件就能接收 high 的数据
export default high ( ToggleButton ) ;
每个经过高阶组件处理过的组件都会复用高阶组件里边的所有逻辑,原则上高阶组件是一个纯函数,不会修改传入的组件,只是返回包装好的新组件。
函数组件的状态共享
Hooks 可以让你在函数组件中使用状态(state)以及其他的 React 特性。
自定义 hook
Hook 是 React 中的一类特殊的 JavaScript 函数。自定义名为 useFriendStatus 的 hook,它通过调用 useState 和 useEffect 来订阅一个好友的在线状态。
 1
 2
 3
 4
 5
 6
 7
 8
 9
10
11
12
13
14
15
16
17
18
import React , { useState , useEffect } from "react" ;
function useFriendStatus ( friendID ) {
const [ isOnline , setIsOnline ] = useState ( null );
function handleStatusChange ( status ) {
setIsOnline ( status . isOnline );
}
useEffect (() => {
ChatAPI . subscribeToFriendStatus ( friendID , handleStatusChange );
return () => {
ChatAPI . unsubscribeFromFriendStatus ( friendID , handleStatusChange );
};
});
return isOnline ;
}
自定义 Hook 更像是一种约定而不是功能。如果函数的名字以 “use” 开头并调用其他 Hook,我们就说这是一个自定义 Hook。
现在我们可以在下面两个组件中使用它:
1
2
3
4
5
6
7
8
function FriendStatus ( props ) {
const isOnline = useFriendStatus ( props . friend . id );
if ( isOnline === null ) {
return "Loading..." ;
}
return isOnline ? "Online" : "Offline" ;
}
1
2
3
4
5
6
7
function FriendListItem ( props ) {
const isOnline = useFriendStatus ( props . friend . id );
return (
< li style = {{ color : isOnline ? "green" : "black" }}>{ props . friend . name }</ li >
);
}
这两个组件的 state 是完全独立的,Hook 是一种复用状态逻辑的方式,它不复用 state 本身。传入不同的 props,得到的 state 也不同。同样是实现了 UI 与状态分离,便于逻辑的复用。
但是使用 Hook 会有几个额外的规则:
只能在函数最外层调用 Hook。不要在循环、条件判断或者子函数中调用
不要在普通 Javascript 函数中调用
在 React 的函数组件调用 Hook
在自定义的 Hook 中调用 Hook
自定义的 hook 必须以 “use” 开头
状态管理
实现状态管理的前提是能够状态共享,这就是为什么前面会先说状态共享。不同类型的组件实现状态共享的方法不同,状态管理的方案也不同。下面是一个计数器的状态管理的不同实现方案。
class 组件的状态管理
class 组件的状态管理,通常方案是使用第三方库 Redux,结合 React-Redux 使用:
1
$ npm i redux react-redux -S
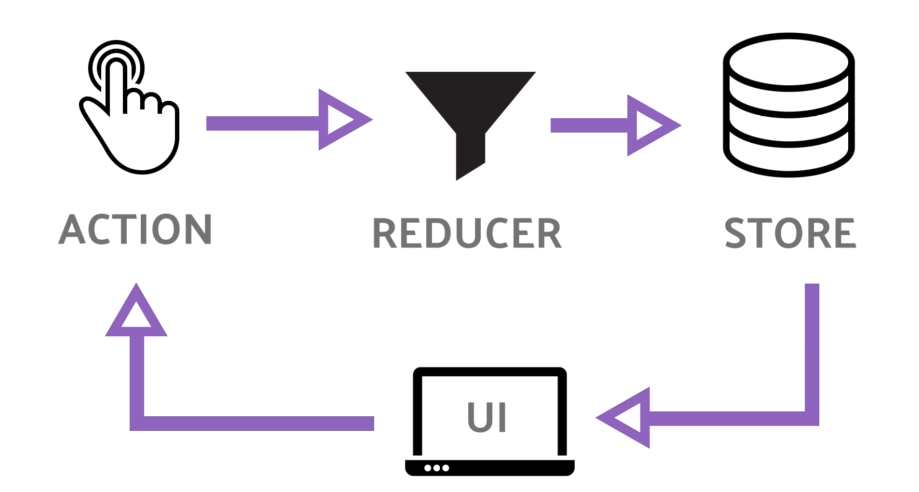
Redux 流程图
Redux流程图
当 UI 的 state 变化时,组件 dispatch 发送 action 信号, reducer 接收来自 action 的信号更新 state, 然后 store 将新的 state 传递给组件,重新渲染 UI。
先创建 store,接收 reducer 为参数:
1
2
3
4
5
6
7
import { createStore } from "redux" ;
import reducer from "./reducer" ;
//创建store
const store = createStore ( reducer );
export default store ;
再写 action,写 action 之前先了解一下 connect 函数
1
2
// React Redux 的 `connect` 函数
const connect ( mapStateToProps , mapDispatchToProps )( Component );
可能看起来有些怪, 这样写你就明白了:
1
2
3
4
//先传递两个参数将 connect 封装成高阶函数
const higherOrderComponent = connect ( mapStateToProps , mapDispatchToProps );
//再得到新包装的组件 EnhancedComponent
const EnhancedComponent = higherOrderComponent ( Component );
action 就是 dispatch 中的参数。
 1
 2
 3
 4
 5
 6
 7
 8
 9
10
11
12
13
14
15
16
17
18
19
20
21
22
// connect.js
import { connect } from "react-redux" ;
const mapStateToProps = ( state ) => {
return { count : state . count , message : state . message };
};
const mapDispatchToProps = ( dispatch ) => {
return {
increment : ( data ) => {
dispatch ({ type : "INCREMENT" , num : data , message : "Incremented" });
},
decrement : ( data ) => {
dispatch ({ type : "DECREMENT" , num : data , message : "Decremented" });
},
reset : () => {
dispatch ({ type : "RESET" , message : "Reset" });
},
};
};
//封装了一个高阶组件,注意高阶组件是函数
export default connect ( mapStateToProps , mapDispatchToProps );
最后写 reducer,接收 action 更新 state:
 1
 2
 3
 4
 5
 6
 7
 8
 9
10
11
12
13
14
15
16
17
18
19
20
21
22
23
24
const initialState = { count : 0 , message : "" };
const reducer = ( state = initialState , action ) => {
switch ( action . type ) {
case "INCREMENT" :
return {
count : state . count + action . num ,
message : action . message ,
};
case "DECREMENT" :
return {
count : state . count - action . num ,
message : action . message ,
};
case "RESET" :
return {
count : 0 ,
message : action . message ,
};
default :
return state ;
}
};
export default reducer ;
创建一个组件测试计数器:
 1
 2
 3
 4
 5
 6
 7
 8
 9
10
11
12
13
14
15
16
17
18
19
20
21
import React , { Component } from "react" ;
import connect from "./connect" ;
class Count extends Component {
render () {
let { count , message , increment , decrement , reset } = this . props ; //来自 connect
return (
< div >
{ count }
< button onClick = {() => increment ( 1 )}> + 1 </ button >
< button onClick = {() => decrement ( 3 )}> - 3 </ button >
< button onClick = {() => reset ()}> reset </ button >
{ message }
</ div >
);
}
}
// 导入的 './connect' 是高阶组件,传入 Count 组件, Count就能接收 store 中的数据
export default connect ( Count );
根组件注册 store,并导入 count 组件:
 1
 2
 3
 4
 5
 6
 7
 8
 9
10
11
12
13
14
15
16
import React from "react" ;
import ReactDOM from "react-dom" ;
import { Provider } from "react-redux" ;
import store from "./store" ;
import Count from "./count" ;
function App () {
return (
< Provider store = { store }>
< Count />
</ Provider >
);
}
const rootElement = document . getElementById ( "root" );
ReactDOM . render (< App />, rootElement );
此时启动项目你发现已经能够计数了,但是我们并没有直接操作 store 啊,其实是 connect 帮我们做了这件事,可以看一下精简版的 connect 源码:
 1
 2
 3
 4
 5
 6
 7
 8
 9
10
11
12
13
14
15
16
17
18
19
20
21
22
23
24
25
26
27
28
29
30
31
32
33
34
35
36
37
38
39
40
41
42
import React , { Component } from "react" ;
import PropTypes from "prop-types" ;
const connect = ( mapStateToProps , mapDispatchToProps ) => ( WrappedComponent ) => {
class Connect extends Component {
static contextTypes = {
store : PropTypes . object ,
};
constructor () {
super ();
this . state = { allProps : {} };
}
componentWillMount () {
const { store } = this . context ;
this . _updateProps ();
store . subscribe ( this . _updateProps );
}
_updateProps = () => {
const { store } = this . context ;
let stateProps = mapStateToProps ( store . getState ());
let dispatchProps = mapDispatchToProps ( store . dispatch );
this . setState ({
allProps : {
... stateProps ,
... dispatchProps ,
... this . props ,
},
});
};
render () {
return < WrappedComponent { ...this.state.allProps } />;
}
}
return Connect ;
};
export default connect ;
你会发现 store 实际上是通过 Context 创建的,Context 是 React 中的 API 方法: Context 提供了一个无需为每层组件手动添加 props,就能在组件树间进行数据传递的方法。
有了状态共享方法(高阶组件)和数据传递的方法(Context), 就能让在整个组件树中的各个组件都很方便的读取状态修改状态, 就实现了 React-Redux,下面我会用 hooks 实现类似的全局状态管理。
函数组件的状态管理
实际上 React 已经为我们实现了相应的 hooks, 我们需要做的只是将这些 hooks 灵活的组合在一起。就能够实现状态管理了,还是以实现计数器的为例。
实现一个 React-redux 中的 store 只需以下代码:
 1
 2
 3
 4
 5
 6
 7
 8
 9
10
11
12
13
14
15
16
//store.js
import React , { createContext , useContext , useReducer } from "react" ;
import reducer from "./reducer" ;
const StoreContext = createContext ();
const initialState = { count : 0 , message : "" };
export const StoreProvider = ({ children }) => {
const [ state , dispatch ] = useReducer ( reducer , initialState );
return (
< StoreContext.Provider value = {{ state , dispatch }}>
{ children }
</ StoreContext.Provider >
);
};
export const useStore = () => useContext ( StoreContext );
useReducer 是 useState 的替代方案。它接收一个形如 (state, action) => newState 的 reducer,以及初始状态 initialState,返回值是当前的 state 以及与其配套的 dispatch 方法。
useContext 的参数必须是 context 对象,让你能够读取 context 的值以及订阅 context 的变化。调用了 useContext 的组件会在 context 值变化时重新渲染。你仍然需要在上层组件树中使用 <MyContext.Provider> 来为下层组件提供 context。
OK, 我们的简版 React-redux 就做好了。
写 action, 我们的状态数据从 useCounter 里获取:
 1
 2
 3
 4
 5
 6
 7
 8
 9
10
11
12
13
14
15
//storeApi.js
import { useStore } from "./store" ;
export const useCounter = () => {
const { state , dispatch } = useStore ();
return {
count : state . count ,
message : state . message ,
increment : ( data ) =>
dispatch ({ type : "INCREMENT" , num : data , message : "Incremented" }),
decrement : ( data ) =>
dispatch ({ type : "DECREMENT" , num : data , message : "Decremented" }),
reset : () => dispatch ({ type : "RESET" , message : "Reset" }),
};
};
写 reducer, 去掉 initialState, 我们已经写在了 useReducer 里, 原因是:
React 不使用 state = initialState 这一由 Redux 推广开来的参数约定。有时候初始值依赖于 props,因此需要在调用 Hook 时指定。
 1
 2
 3
 4
 5
 6
 7
 8
 9
10
11
12
13
14
15
16
17
18
19
20
21
22
23
24
// reducer.js
const reducer = ( state , action ) => {
switch ( action . type ) {
case "INCREMENT" :
return {
count : state . count + action . num ,
message : action . message ,
};
case "DECREMENT" :
return {
count : state . count - action . num ,
message : action . message ,
};
case "RESET" :
return {
count : 0 ,
message : action . message ,
};
default :
return state ;
}
};
export default reducer ;
写个组件,测试一下:
 1
 2
 3
 4
 5
 6
 7
 8
 9
10
11
12
13
14
15
16
17
//Count.js
import React from "react" ;
import { useCounter } from "./storeApi" ;
export const Count = () => {
const { count , message , increment , decrement , reset } = useCounter ();
return (
< div >
{ count }
< button onClick = {() => increment ( 1 )}> + 1 </ button >
< button onClick = {() => decrement ( 3 )}> - 3 </ button >
< button onClick = {() => reset ()}> Reset </ button >
{ message }
</ div >
);
};
修改根组件如下:
 1
 2
 3
 4
 5
 6
 7
 8
 9
10
11
12
13
14
15
import React from "react" ;
import ReactDOM from "react-dom" ;
import { StoreProvider } from "./store" ;
import { Count } from "./Count" ;
function App () {
return (
< StoreProvider >
< Count />
</ StoreProvider >
);
}
const rootElement = document . getElementById ( "root" );
ReactDOM . render (< App />, rootElement );
启动服务,发现能够计数成功,我们的状态管理方案成功了。