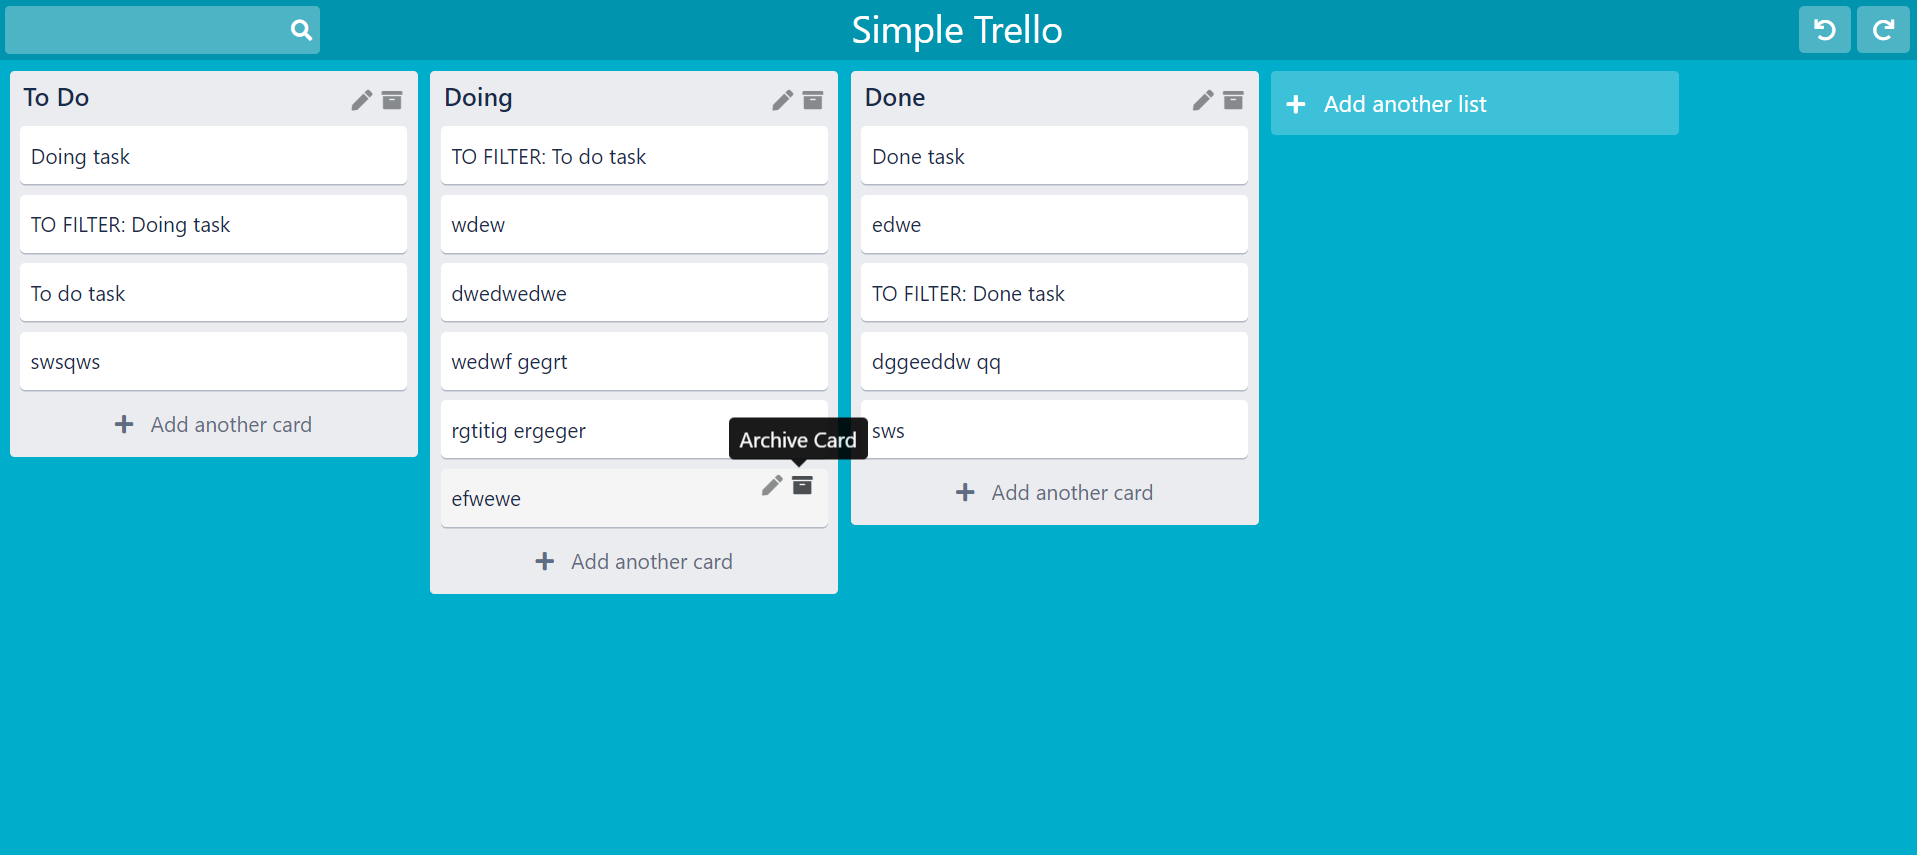
本文记录 react-beautiful-dnd 这个拖拽库的使用,我们将完成一个类似 trello 的看板应用。最终实现的效果如下:List 是一个可横向拖放的列表,Card 可在不同的 List 列表之间拖放。左上方的搜索框能够搜索筛选卡片,右上方的按钮能够实现撤销重做功能。
可拖拽Trello页面展示
拖拽库的使用
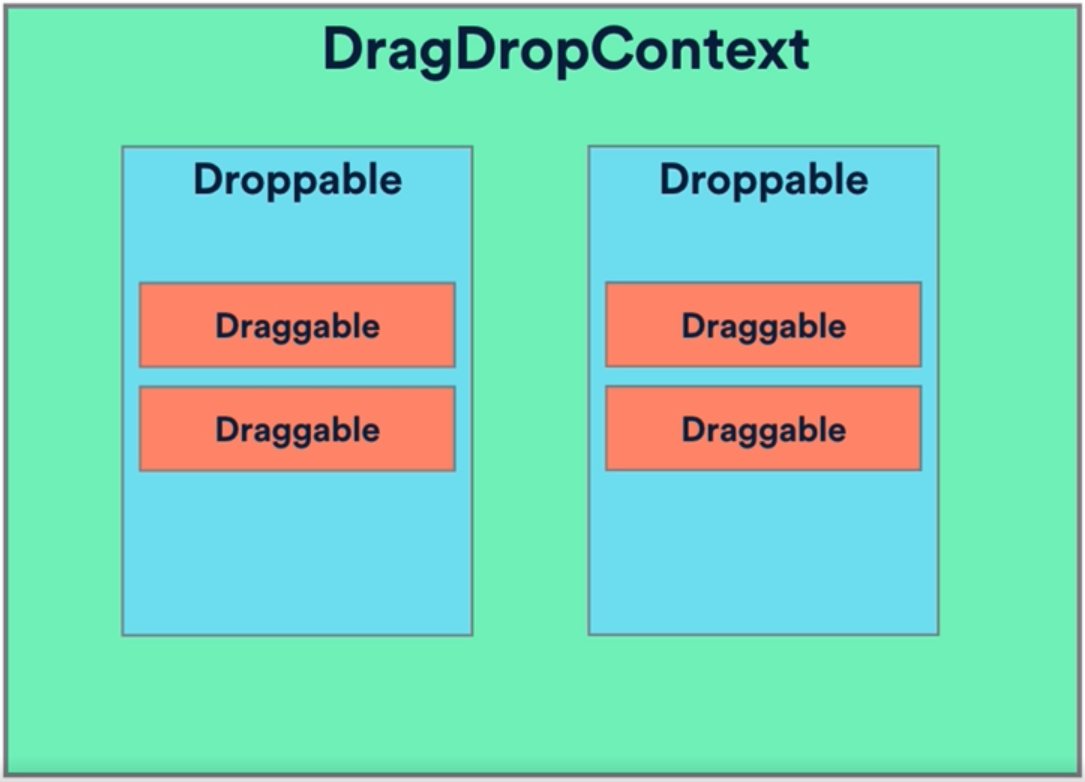
react-beautiful-dnd 这个库使用 render-props 完成组件逻辑复用。react-beautiful-dnd 有 3 个主要组件:DragDropContext,Droppable 和 Draggable。这三者的关系如下:
react-beautiful-dnd库的使用
DragDropContext 表示一个全局拖拽上下文。Droppable 表示可以被拖入的容器,Draggable 是可被拖放的组件。
DragDropContext 提供了以下三个钩子:
onDragStart 拖动开始时执行。
onDragUpdate 拖动过程中的执行。
onDragEnd 拖拽结束时执行,且 onDragEnd 必须设定。
我们需要在 Board 组件内建立可拖动范围,则需要这样写:
1
2
3
4
5
6
7
8
// components/Board.js
const Board = () => {
// onDragEnd 需实现
const onDragEnd = ( result ) => {};
return < DragDropContext onDragEnd = { onDragEnd }>...</ DragDropContext >;
};
Droppable:
Droppable 必须设定 droppableId
Droppable 使用 render-props 意味着内部须使用一个函数,该函数接收参数 provided 对象, 然后将参数 provided 的属性传递给封装后的可拖放的容器组件
将 Board 组件建立成可拖放的容器组件,像这样写:
 1
 2
 3
 4
 5
 6
 7
 8
 9
10
11
12
13
14
15
16
17
18
19
20
21
22
23
24
25
26
// components/Board.js
// 需嵌套在 DragDropContext 内
// 包裹 List 的容器,List 在 Board 容器内横向拖动
< Droppable droppableId = "all-lists" direction = "horizontal" type = "list" >
{( provided ) => (
// 封装后的可拖放的容器组件
< ListContainer ref = { provided . innerRef } { ...provided.droppableProps }>
// 遍历所有的列表,将列表数据传递给每个列表
{ Object . keys ( lists ). map (( key , index ) => {
const list = lists [ key ];
const listCards = list . cards . length > 0 ? list . cards : [];
return (
< List
key = { list . id }
id = { list . id }
title = { list . title }
cards = { listCards }
index = { index }
/>
);
})}
{ provided . placeholder }
</ ListContainer >
)}
</ Droppable >
Draggable:
Draggable 必须设定 draggableId,index(由父组件传入)
Draggable 与 Droppable 一样是 render-props,接收 provided 对象,返回值是封装后的可拖放组件
将 List 组件建立成可拖放组件,像这样写:
 1
 2
 3
 4
 5
 6
 7
 8
 9
10
11
12
13
14
15
16
17
18
19
20
// components/List.js
// 设置每个 List 都是可拖动的
const List = ({ id , title , cards = [], index }) => {
...
return (
< Draggable draggableId = { id } index = { index }>
{ provided => (
// 封装后的可拖放组件
< ListContainer
ref = { provided . innerRef }
{ ...provided.draggableProps }
// dragHandleProps 绑定的组件 ListContainer 可拖动
{ ...provided.dragHandleProps }>
...
</ ListContainer >
)}
</ Draggable >
);
}
同理设置 Card 组件可在 List 组件内部拖动,先要将 List 内部封装成可拖放的容器,像这样写:
 1
 2
 3
 4
 5
 6
 7
 8
 9
10
11
12
13
14
15
16
17
18
19
20
21
// components/List.js
// 需嵌套在 List 组件返回的 ListContainer 内
// 包裹 Card 的容器,Card 在 List 容器内可拖放
< Droppable droppableId = { id } type = "card" >
{( provided ) => (
< CardContainer ref = { provided . innerRef } { ...provided.droppableProps }>
// 遍历每个 List 中所有的卡片,将卡片数据传给每张卡片
{ cards . map (( card , index ) => (
< Card
key = { card . id }
id = { card . id }
text = { card . text }
listId = { id }
index = { index }
/>
))}
{ provided . placeholder }
</ CardContainer >
)}
</ Droppable >
将 Card 组件封装成可拖放组件,像这样写:
 1
 2
 3
 4
 5
 6
 7
 8
 9
10
11
12
13
14
15
16
17
18
// components/Card.js
const Card = ({ id , text , index , listId }) => {
...
return (
< Draggable draggableId = { id } index = { index }>
{ provided => (
< CardContainer
className = 'card'
ref = { provided . innerRef }
{ ...provided.draggableProps }
// dragHandleProps 绑定的组件 CardContainer 可拖动
{ ...provided.dragHandleProps }>
</ CardContainer >
)}
</ Draggable >
);
}
状态管理
初始化列表数据:
 1
 2
 3
 4
 5
 6
 7
 8
 9
10
11
12
13
14
15
16
17
18
19
20
21
22
23
24
25
26
// morkData.js
import { uuid } from "uuidv4" ;
const getCard = ( text ) => ({
id : uuid (),
text ,
});
export const ListState = [
{
id : uuid (),
title : "To Do" ,
cards : [ getCard ( "To do task" ), getCard ( "TO FILTER: To do task" )],
},
{
id : uuid (),
title : "Doing" ,
cards : [ getCard ( "Doing task" ), getCard ( "TO FILTER: Doing task" )],
},
{
id : uuid (),
title : "Done" ,
cards : [ getCard ( "Done task" ), getCard ( "TO FILTER: Done task" )],
},
];
记录状态变更用 DragDropContext 上的钩子函数 onDragEnd,onDragEnd 接收一个 result 对象,result 记录了拖拽过程中的状态变化,result 结构如下:
 1
 2
 3
 4
 5
 6
 7
 8
 9
10
11
12
const result = {
draggableId : 1 , // 移动的组件 id
type : "list" ,
source : {
droppableId : 1 , // 移动前所在的容器 id
index : 2 , // 组件在移动前的容器内的位置
},
destination : {
droppableId : 3 , // 移动后所在的容器 id
index : 1 , // 组件在移动后的容器内的位置
},
};
我们需要写拖放组件后的状态变化逻辑,因为我们的列表数据中的 cards 数组发生了变化,但我们还没有把新的状态渲染到 list 组件中,拖放组件后需要重新排序,现在去实现在 Board 组件中定义的 onDragEnd 钩子函数:
 1
 2
 3
 4
 5
 6
 7
 8
 9
10
11
12
13
14
15
16
// components/Board.js
const onDragEnd = ({ draggableId , type , source , destination }) => {
if ( destination ) {
dispatch (
sort (
source . droppableId ,
destination . droppableId ,
source . index ,
destination . index ,
draggableId ,
type
)
);
}
};
action 用 payload 传递接收到的数据:
 1
 2
 3
 4
 5
 6
 7
 8
 9
10
11
12
13
14
15
16
17
18
19
20
21
22
23
24
25
26
// actions/listActions.js
import { CONSTANTS } from '.' ;
...
export const sort = (
droppableIdStart ,
droppableIdEnd ,
droppableIndexStart ,
droppableIndexEnd ,
draggableId ,
type
) => {
return {
type : CONSTANTS . DRAGGED , // 动作是拖放,可能是列表,也可能是卡片
payload : {
droppableIdStart , //开始时所在的 container id
droppableIdEnd , //结束时所在的 container id
droppableIndexStart , //开始所在 container 里的索引
droppableIndexEnd , //结束时所在的 container 里的索引
draggableId , // 移动的组件 id
type
}
};
};
reducer 实现状态变化逻辑并返回新状态,始终用新状态替换原来的状态 ,不要直接在原来的对象上操作,因为我们将会对每个状态做记录,这有利于我们实现撤销重做功能。
 1
 2
 3
 4
 5
 6
 7
 8
 9
10
11
12
13
14
15
16
17
18
19
20
21
22
23
24
25
26
27
28
29
30
31
32
33
34
35
36
37
38
39
40
41
42
43
// reducers/listReducer.js
case CONSTANTS . DRAGGED : { // 当完成拖放动作时
const {
droppableIdStart ,
droppableIdEnd ,
droppableIndexStart ,
droppableIndexEnd ,
type
} = action . payload ;
const newState = [... state ]; //不可变更新模拟深拷贝,不改变原列表
if ( type === 'list' ) {
const moveList = newState . splice ( droppableIndexStart , 1 );
newState . splice ( droppableIndexEnd , 0 , ... moveList );
console . log ( 'Drag list' , newState );
return newState ;
}
const sourceListIndex = newState . findIndex ( list => droppableIdStart === list . id );
const sourceList = newState [ sourceListIndex ];
const sourceCards = [... sourceList . cards ]; //不可变更新模拟深拷贝,不改变原数组
const moveCard = sourceCards . splice ( droppableIndexStart , 1 );
if ( droppableIdStart !== droppableIdEnd ) { //不同列之间移动卡片
const destinationListIndex = newState . findIndex ( list => droppableIdEnd === list . id );
const destinationList = newState [ destinationListIndex ];
const destinationCards = [... destinationList . cards ];
destinationCards . splice ( droppableIndexEnd , 0 , ... moveCard );
newState [ destinationListIndex ] = {
... newState [ destinationListIndex ],
cards : destinationCards
};
} else { //同列中改变卡片次序
sourceCards . splice ( droppableIndexEnd , 0 , ... moveCard );
}
newState [ sourceListIndex ] = {
... newState [ sourceListIndex ],
cards : sourceCards
};
console . log ( 'Drag card' , newState );
return newState ;
}
这样就实现了移动列表和移动卡片的状态变化逻辑,剩下的列表和卡片的增删改查的状态变化逻辑的实现就比较容易了。
搜索卡片
在界面上实现卡片的搜索功能,实际上就是实现筛选卡片功能。我们已经在每个 List 组件中遍历其中的 Card,筛选功能就是每个 List 组件根据搜索框的输入内容选择性的遍历 Card,修改 List 组件如下:
 1
 2
 3
 4
 5
 6
 7
 8
 9
10
11
12
13
14
15
16
17
18
19
20
21
22
23
// components/List.js
...
< Droppable droppableId = { String ( id )} type = "card" >
{( provided , snapshot ) => (
< CardListContainer ref = { provided . innerRef }
isDraggingOver = { snapshot . isDraggingOver }
{ ...provided.droppableProps }>
// 筛选出每个 List 中符合搜索条件的 cards
{ getFilteredCards ( cards , searchText ). map (( card , index ) => (
< Card
key = { card . id }
id = { card . id }
text = { card . text }
listId = { id }
index = { index }
/>
))}
{ provided . placeholder }
</ CardListContainer >
)}
</ Droppable >
实现其中的 getFilteredCards 方法:
1
2
3
4
5
6
7
8
9
const getFilteredCards = ( cards , searchText ) => {
if ( searchText ) {
console . log ( searchText );
return cards . filter (( card ) =>
card . text . toLowerCase (). includes ( searchText . toLowerCase ())
);
}
return cards ;
};
撤销重做功能
实现撤销重做功能可用 redux-undo
这个库,自己实现也不复杂,下面就自己实现:
实现方法是自定义一个接收 reducer 为参数,返回新 reducer 的函数(reducer enhancer),监听 listReducer 的变化并做记录。实现思路来自 redux 官方文档
。原本创建 store 时需要导出的 reducer 如下:
1
2
3
4
5
6
7
8
// reducers/index.js
const rootReducer = combineReducers ({
lists : listReducer ,
...
});
export default rootReducer ;
combineReducers 接收值为 reducer 的函数作为参数,我们只要实现一个返回值为 reducer 的函数(reducer enhancer)就行:
1
2
3
4
5
6
const rootReducer = combineReducers ({
board : stateEnhancer ( listReducer ),
...
});
export default rootReducer ;
board 对应的值是将 listReducer 封装后的新 reducer,这样每次调用 listReducer 时也会调用 stateEnhancer,因为函数的参数发生了变化,函数就会重新执行。
 1
 2
 3
 4
 5
 6
 7
 8
 9
10
11
12
13
14
15
16
17
18
19
20
21
22
23
24
25
26
27
28
29
30
31
32
33
34
35
36
37
38
39
40
41
42
43
44
45
46
47
48
49
50
51
52
53
// reducers/stateEnhancer.js
import { CONSTANTS } from "../actions" ;
const stateEnhancer = ( reducer ) => {
const initialState = {
previousStates : [],
currentState : reducer ( undefined , {}), // currentState 取 reducer 的返回值
futureStates : [],
};
// 调用 reducer 时就会调用 stateEnhancer, 并返回封装后的 reducer
return ( state = initialState , action ) => {
// console.log(state.currentState);
const { previousStates , currentState , futureStates } = state ;
switch ( action . type ) {
case CONSTANTS . UNDO_ACTION :
const previous = previousStates [ previousStates . length - 1 ];
const newPreviousStates = previousStates . slice (
0 ,
previousStates . length - 1
);
return {
previousStates : newPreviousStates ,
currentState : previous ,
futureStates : [ currentState , ... futureStates ],
};
case CONSTANTS . REDO_ACTION :
const next = futureStates [ 0 ];
const newFutureStates = futureStates . slice ( 1 );
return {
previousStates : [... previousStates , currentState ],
currentState : next ,
futureStates : newFutureStates ,
};
default :
const newCurrentState = reducer ( currentState , action );
if ( currentState === newCurrentState ) {
//初始化列表
console . log ( "init" );
return state ;
}
console . log ( "list change" ); // 列表变化时
return {
previousStates : [...( previousStates || []), currentState ],
currentState : newCurrentState ,
futureStates : [],
};
}
};
};
export default stateEnhancer ;
我们用了三个数组记录 listReducer 的变化,按下撤销或者重做功能按钮时,就能在不同的 listReducer 之间切换。并且我们可以根据 previousStates, futureStates 是否为空来判断撤销,重做按钮是否可用:
1
2
3
4
5
6
< DoBtn onClick = { undo } disabled = { previousStates . length === 0 } className = 'btn' >
< i className = "fas fa-undo" ></ i >
</ DoBtn >
< DoBtn onClick = { redo } disabled = { futureStates . length === 0 } className = 'btn' >
< i className = "fas fa-redo" ></ i >
</ DoBtn >
附:源码地址
参阅资料