本次实践我将使用 Angular 和 Nest.js 写一个带有状态管理,登录验证的全栈 todolist 应用。
后端开发
后端开发使用 Nest.js 框架,本次实践是重前端的,因此后端会做得简单一些。后端是在上一次鉴权认证的代码做部分修改。如果有不懂的代码,可以参考之前的文章
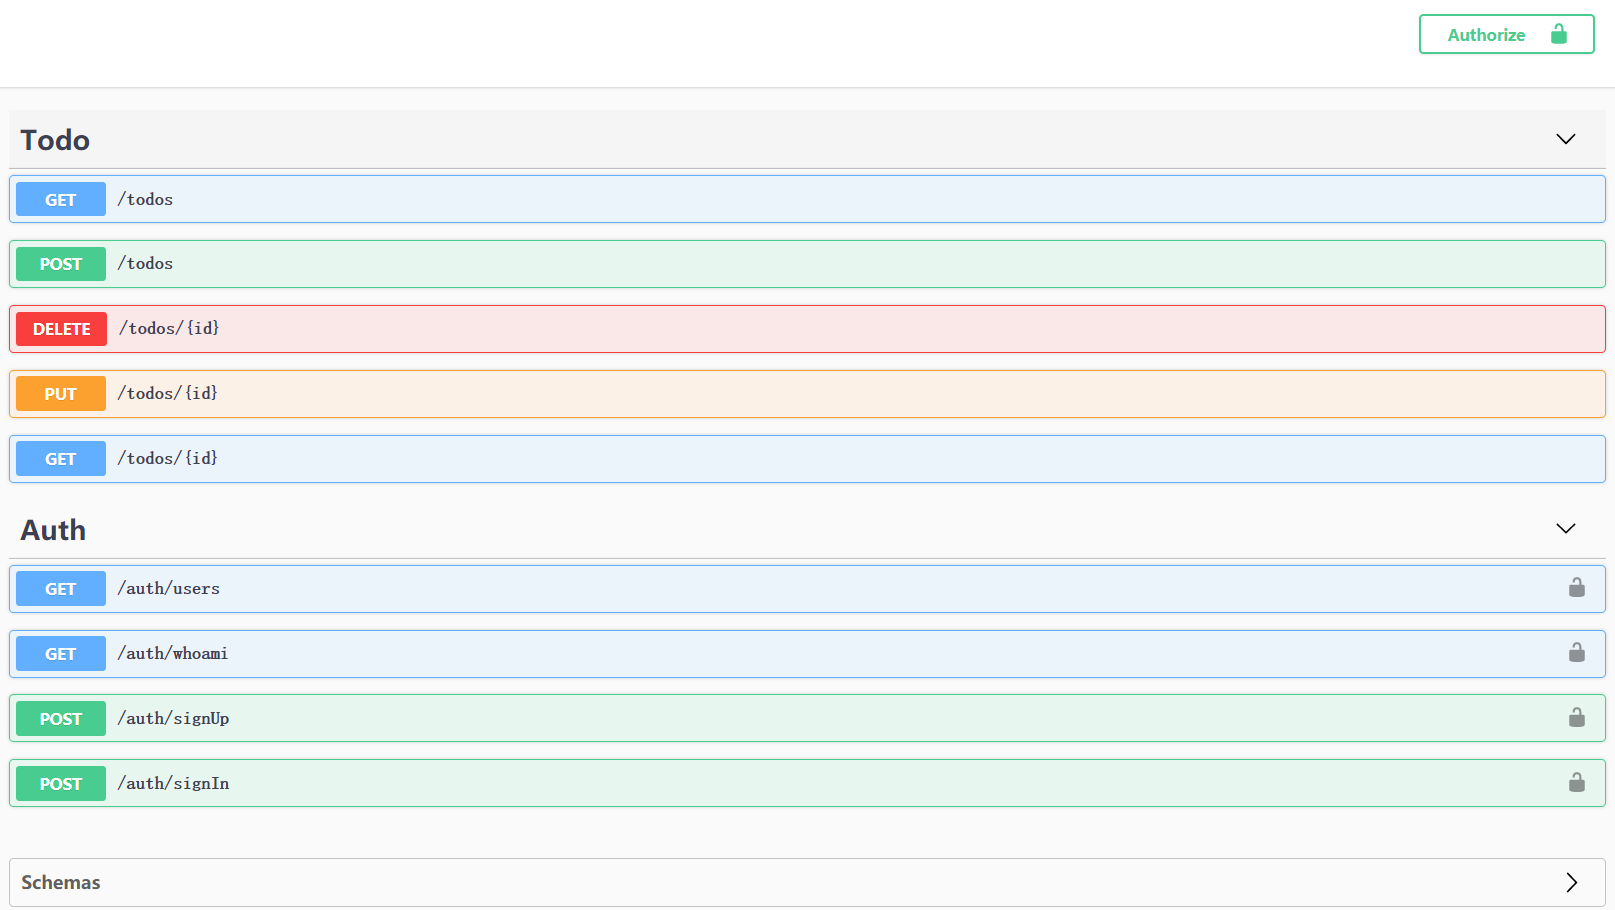
。此部分的讲解略过。这是后端部分生成的 swagger 接口文档:
swagger接口文档
前端开发
前端使用 Angular 框架。为什么使用 Angular? 以下几点是我选择它的原因:
1.它是前端真正意义上的框架。
2.它的一些理念是相当超前。
3.Nest.js 和 Angular 非常像。
4.前后端开发同构语言。
不过它的缺点也很显著,或者说是我的缺点:
1.学习到会用有较长的时间周期。
2.HMR(hot module replacement) 体验太差。
3.报错信息简直了。
组件开发
导入 UI 组件库
在样式开发方面,我们使用 angular 官方提供的 Material UI。用一个 MaterialModule,导出我们需要用到的所有样式组件。
 1
 2
 3
 4
 5
 6
 7
 8
 9
10
11
12
13
@NgModule ({
exports : [
MatButtonModule ,
MatCardModule ,
MatDialogModule ,
MatIconModule ,
MatInputModule ,
MatListModule ,
MatToolbarModule ,
MatMenuModule ,
],
})
export class MaterialModule {}
这样在我们需要用到样式组件时,直接导入 MaterialModule 就好。
顶部导航
在 AppModule 中导入 MaterialModule, 然后在 app.component.html 中写入顶部 header 导航组件。
 1
 2
 3
 4
 5
 6
 7
 8
 9
10
11
12
13
14
15
16
17
18
19
20
21
22
23
24
25
26
27
28
29
30
31
32
33
34
< header >
< mat-toolbar color = "primary" class = "expanded-toolbar" >
< div >
< span > {{title}}</ span >
< button mat-button routerLink = "/todos" >
< mat-icon > view_lists</ mat-icon >
Todo
</ button >
</ div >
< div >
< button
mat-button
routerLink = "/login"
* ngIf = "authService.token.length == 0"
>
< mat-icon > account_box</ mat-icon >
Login
</ button >
< button
mat-button
routerLink = "/login"
* ngIf = "authService.token.length > 0"
( click )=" logout ()"
>
< mat-icon > exit_to_app</ mat-icon >
Logout
</ button >
</ div >
</ mat-toolbar >
</ header >
< main >
< router-outlet ></ router-outlet >
</ main >
<!-- <footer></footer> -->
顶部导航写在 header 标签中,router-outlet 是路由插座,当路由跳转时,我们导入的组件会替换掉 router-outlet 标签。登录成功后显示 Logout button,未登录或登出用户后显示 Login button。在 css 中做些样式调整,接下来是路由注册模块。新建一个 app-routing.module.ts 组件:
 1
 2
 3
 4
 5
 6
 7
 8
 9
10
11
12
13
14
15
16
17
18
19
20
21
import { NgModule } from "@angular/core" ;
import { Routes , RouterModule } from "@angular/router" ;
const routes : Routes = [
{
path : "login" ,
loadChildren : () =>
import ( "./features/auth/auth.module" ). then (( m ) => m . AuthModule ),
},
{
path : "todos" ,
loadChildren : () =>
import ( "./features/todo/todo.module" ). then (( m ) => m . TodoModule ),
},
];
@NgModule ({
imports : [ RouterModule . forRoot ( routes )],
exports : [ RouterModule ],
})
export class AppRoutingModule {}
我们注册了路由,因为我们会在导入的模块中进行状态管理,因此这里会用 Angular 中的 Lazy-loading 方式导入模块。这样,当路由匹配 login 时 auth.module.ts 中的 component 成为 main,当路由匹配 todos 时 todo.module.ts 中的 component 成为 main。
登录表单
在 auth.module.ts 只用一个登录组件,导入一些我们需要用到的表单模块。
 1
 2
 3
 4
 5
 6
 7
 8
 9
10
11
@NgModule ({
imports : [
CommonModule ,
FormsModule ,
ReactiveFormsModule ,
MaterialModule ,
AuthRoutingModule ,
],
declarations : [ LoginComponent ],
})
export class AuthModule {}
先创建出 login 组件,可以用 cli 的方式生成:$ nest g component login,也可以手动新建文件:login.component.html,“error$ | async” 是因为我们传递的是 obeservable 对象,我们先不说 login.component.ts, 这一部分在后面的状态管理中再说。
 1
 2
 3
 4
 5
 6
 7
 8
 9
10
11
12
13
14
15
16
17
18
19
20
21
22
23
24
25
26
27
28
29
30
< mat-card >
< mat-card-content >
< form [ formGroup ]=" form " ( ngSubmit )=" onSubmit ()" >
< h2 > Login</ h2 >
< mat-error * ngIf = "error$ | async" >
The username and password were not recognised
</ mat-error >
< mat-form-field class = "full-width-input" >
< input
matInput
placeholder = "Username"
formControlName = "username"
required
/>
< mat-error > Please provide a valid email address </ mat-error >
</ mat-form-field >
< mat-form-field class = "full-width-input" >
< input
matInput
type = "password"
placeholder = "Password"
formControlName = "password"
required
/>
< mat-error > Please provide a valid password </ mat-error >
</ mat-form-field >
< button mat-raised-button color = "primary" > Login</ button >
</ form >
</ mat-card-content >
</ mat-card >
然后注册路由 auth-routing.module.ts:
 1
 2
 3
 4
 5
 6
 7
 8
 9
10
11
12
13
14
15
16
import { NgModule } from "@angular/core" ;
import { Routes , RouterModule } from "@angular/router" ;
import { LoginComponent } from "./login/login.component" ;
const routes : Routes = [
{
path : "" ,
component : LoginComponent ,
},
];
@NgModule ({
imports : [ RouterModule . forChild ( routes )],
exports : [ RouterModule ],
})
export class AuthRoutingModule {}
todolist 列表
创建 todo.component.html, 捕获 todolist 对应的增删改查事件:
 1
 2
 3
 4
 5
 6
 7
 8
 9
10
11
12
13
14
15
16
17
18
19
< mat-card >
< ng-container * ngIf = "vm$ | async as vm" >
< h2 > Todo Lists</ h2 >
< mat-action-list role = "list" >
< app-todo-list-item
* ngFor = "let todo of vm.todos"
[ todo ]=" todo "
[ loading ]=" vm . loading "
( update )=" showEditDialog ($ event )"
( remove )=" showRemoveDialog ($ event )"
></ app-todo-list-item >
</ mat-action-list >
</ ng-container >
</ mat-card >
< div class = "fab-bottom-right" >
< button mat-fab color = "accent" aria-label = "Add" ( click )=" showCreateDialog ()" >
< mat-icon > add</ mat-icon >
</ button >
</ div >
todo 单项
todolist 模板中的 remove, update 不是 js 原生事件, 我们需要注册对应的 EventEmitter,它是自定义事件触发与事件监听器功能的封装。todolist 列表是父组件,todo 单项是子组件。父子组件通讯需要用到 @Input() 和 @Output() 装饰器, @Input() 是父传子,@Output() 是子传父。todo-list-item.ts:
 1
 2
 3
 4
 5
 6
 7
 8
 9
10
11
12
@Component ({
selector : "app-todo-list-item" ,
templateUrl : "./todo-list-item.component.html" ,
styleUrls : [ "./todo-list-item.component.scss" ],
changeDetection : ChangeDetectionStrategy.OnPush ,
})
export class TodoListItemComponent {
@Input () loading : boolean ;
@Input () todo : Todo ;
@Output () update = new EventEmitter < Todo >();
@Output () remove = new EventEmitter < string >();
}
自定义事件的触发方法是 EventEmitter.emit(),todo-list-item.html:
 1
 2
 3
 4
 5
 6
 7
 8
 9
10
11
< mat-list-item role = "listitem" ( click )=" update . emit ( todo )" >
< p matLine > {{ todo.text }}</ p >
< button
mat-icon-button
color = "warn"
aria-label = "Remove"
( click )=" remove . emit ( todo . id ); $ event . stopPropagation ()"
>
< mat-icon > delete_outlined</ mat-icon >
</ button >
</ mat-list-item >
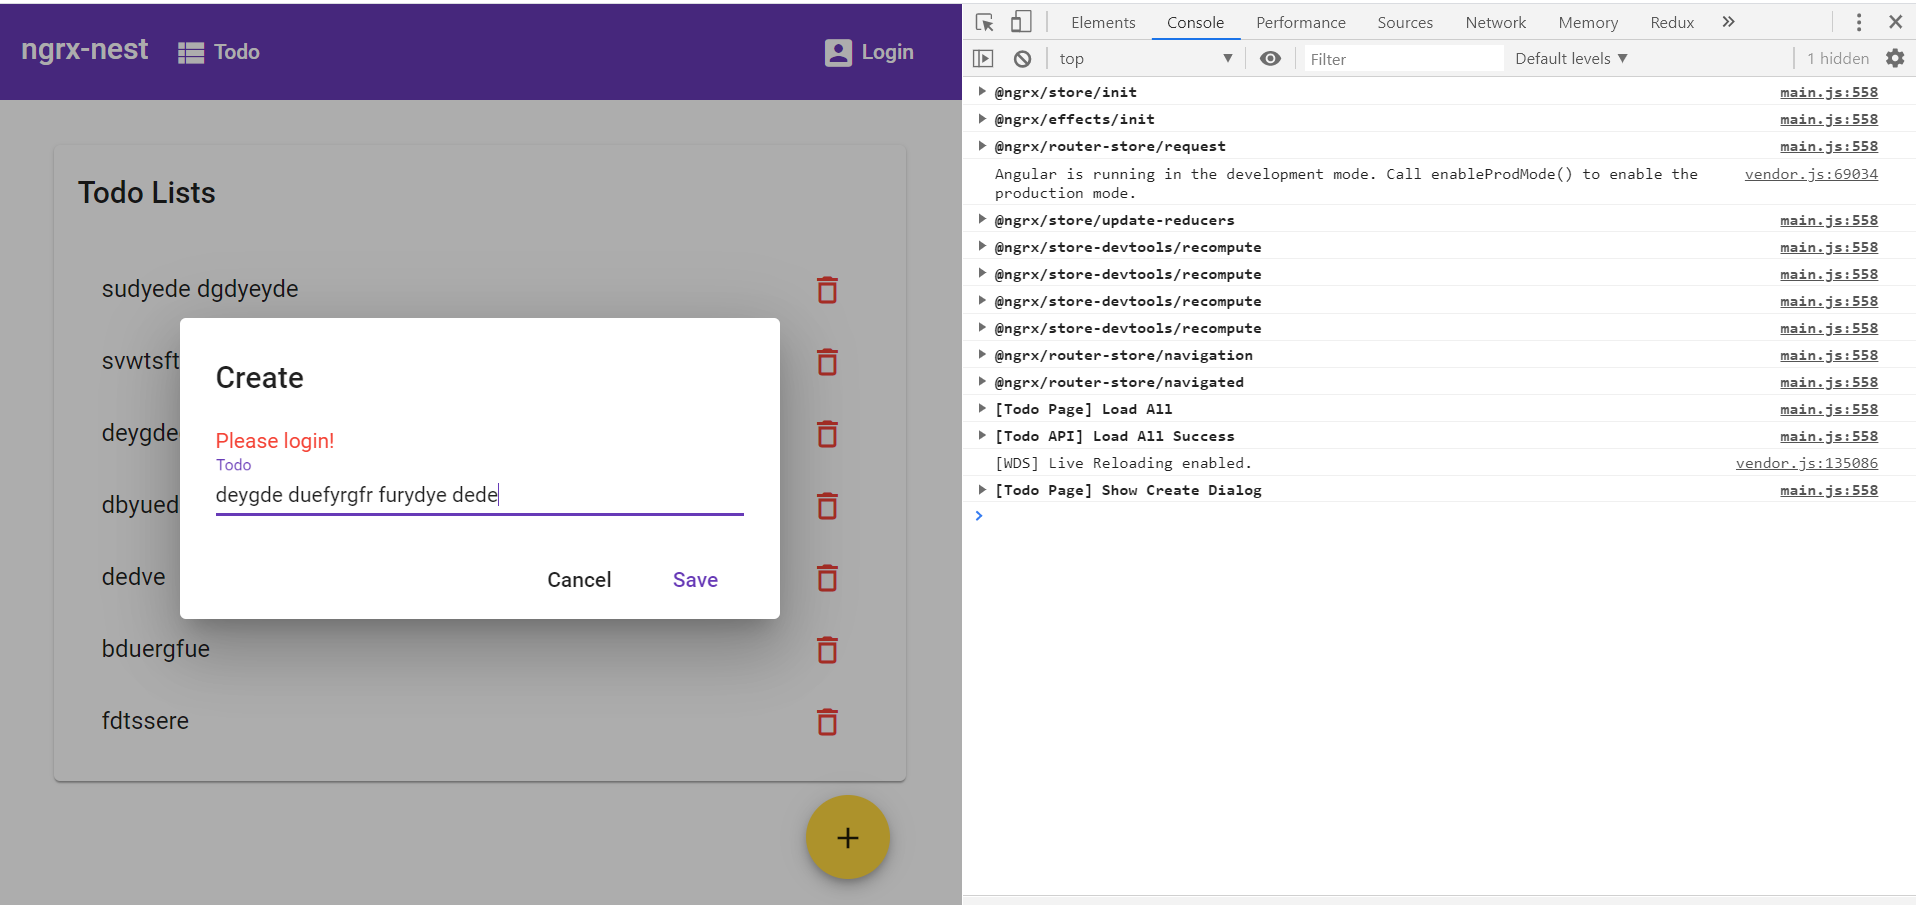
页面弹窗
在处理 todo 事项时,我们希望弹出一个 dialog:
页面弹窗
这样,能监听组件变化,我们的状态变化会显得更加直观。todo-create-dialog.component.ts:
 1
 2
 3
 4
 5
 6
 7
 8
 9
10
11
12
13
14
15
16
17
18
19
20
21
22
23
24
25
< h2 mat-dialog-title > Create</ h2 >
< mat-error * ngIf = "authService.token.length == 0" > Please login! </ mat-error >
< form
class = "form"
[ formGroup ]=" form "
( ngSubmit )=" form . valid && save ()"
novalidate
>
< mat-dialog-content >
< mat-form-field >
< input matInput formControlName = "text" placeholder = "Todo" />
</ mat-form-field >
</ mat-dialog-content >
< mat-dialog-actions align = "end" >
< button type = "button" mat-button mat-dialog-close > Cancel</ button >
< button
type = "submit"
mat-button
color = "primary"
[ disabled ]=" form . invalid || ( loading $ | async )"
>
Save
</ button >
</ mat-dialog-actions >
</ form >
用同样的方式创建修改会话框和删除会话框,在弹出修改会话框时,我们做一个数据的双项绑定。todo-edit-dialog.component.ts:
1
2
3
4
5
6
7
...
< mat-dialog-content >
< mat-form-field >
< input matInput formControlName = "text" placeholder = "Todo" />
</ mat-form-field >
</ mat-dialog-content >
在弹出删除弹出框时,我们只需弹出一个提示语句。todo-delete-dialog.component.ts:
1
2
3
4
5
...
< mat-dialog-content >
< p > Are you sure you want to remove this item?</ p >
</ mat-dialog-content >
登录验证
新建一个 services 文件夹,在其中新建 auth.service.ts 文件:
 1
 2
 3
 4
 5
 6
 7
 8
 9
10
11
12
13
14
15
16
17
18
19
20
21
22
23
24
25
26
27
28
29
30
31
32
33
34
35
36
37
@Injectable ({
providedIn : "root" ,
})
export class AuthService {
private api : string = environment . apiUrl + "/auth" ;
constructor (
private http : HttpClient ,
private router : Router ,
private store : Store
) {}
login ( user : Partial < User >) {
return this . http . post < User >( ` ${ this . api } /signIn` , user ). pipe (
mergeMap (( user : User ) => {
this . token = user . access_token || "" ;
this . router . navigate ([ "todos" ]);
return of ( user );
})
);
}
get token() {
return localStorage . getItem ( "access_token" ) || "" ;
}
set token ( val : string ) {
if ( val . length > 0 ) {
localStorage . setItem ( "access_token" , val );
}
}
logout() {
this . store . dispatch ( UserActions . logout ());
localStorage . clear ();
}
}
为 token 创建一个 setter, getter 方法,登录成功后,为 token 赋值,登出后,将 token 置空。providedIn: ‘root’ 表示我们的 service 是根级作用域。客服端判断用户是否登录成功的方法就是判断我们的 token 是否为空。而服务端将 token 作为验证用户的凭据。用户登录成功后,每次需要用户验证的请求都要求验证 token。我们可以使用拦截器(Interceptor) 对网络请求重新封装。
 1
 2
 3
 4
 5
 6
 7
 8
 9
10
11
12
13
14
15
@Injectable ()
export class AuthInterceptor implements HttpInterceptor {
constructor ( public authService : AuthService ) {}
intercept (
req : HttpRequest < any >,
next : HttpHandler
) : Observable < HttpEvent < any >> {
const authToken = this . authService . token ;
const authReq = req . clone ({
headers : req.headers.set ( "Authorization" , "Bearer " + authToken ),
});
return next . handle ( authReq );
}
}
当我们设置拦截器后,我们需要注册在根模块 app.module.ts 中。
1
2
3
4
5
6
7
providers : [
{
provide : HTTP_INTERCEPTORS ,
useClass : AuthInterceptor ,
multi : true
}
],
添加了全局拦截器后我们就不必在每个请求接口都手动添加 header 的 bear 参数了。
状态管理
状态管理是为了组件之间的数据共享。组件数据发生变化后,不通过不同组件传值这样的方式,而通过一个叫 store 的东西统一管理状态数据,监听状态数据变化。
打印日志
新建一个 store 文件夹,里面新建 app.state.ts 文件,将路由变化 router 加入到 AppState 中。
1
2
3
4
5
import { RouterReducerState } from "@ngrx/router-store" ;
export interface AppState {
router : RouterReducerState ;
}
创建一个 reducers 文件夹, 里面新建 logger.reducer.ts:
 1
 2
 3
 4
 5
 6
 7
 8
 9
10
11
12
13
14
15
16
17
import { ActionReducer } from "@ngrx/store" ;
import { AppState } from "../app.state" ;
export function logger (
reducer : ActionReducer < AppState >
) : ActionReducer < AppState > {
return ( state , action ) => {
const result = reducer ( state , action );
console . groupCollapsed ( action . type );
console . log ( "prev state" , state );
console . log ( "action" , action );
console . log ( "next state" , result );
console . groupEnd ();
return result ;
};
}
这是参考了 NgRx 在 github 上的官方示例
的做法,实现一个控制台的日志打印,当然我们也可以在浏览器安装 redux 扩展程序。新建 index.ts,开发环境下就有日志打印:
 1
 2
 3
 4
 5
 6
 7
 8
 9
10
11
12
13
14
import { ActionReducerMap , MetaReducer } from "@ngrx/store" ;
import * as fromRouter from "@ngrx/router-store" ;
import { environment } from "../../../environments/environment" ;
import { logger } from "./logger.reducer" ;
import { AppState } from "../app.state" ;
export const reducers : ActionReducerMap < AppState > = {
router : fromRouter.routerReducer ,
};
export const metaReducers : MetaReducer < AppState >[] = ! environment . production
? [ logger ]
: [];
理解状态管理
写本篇文章的目的之一是将状态管理实践验证。之前我有说前端的状态管理相当于后端的数据库。接下来我将一步一步的验证这个说法。下面以用户状态来讲解。
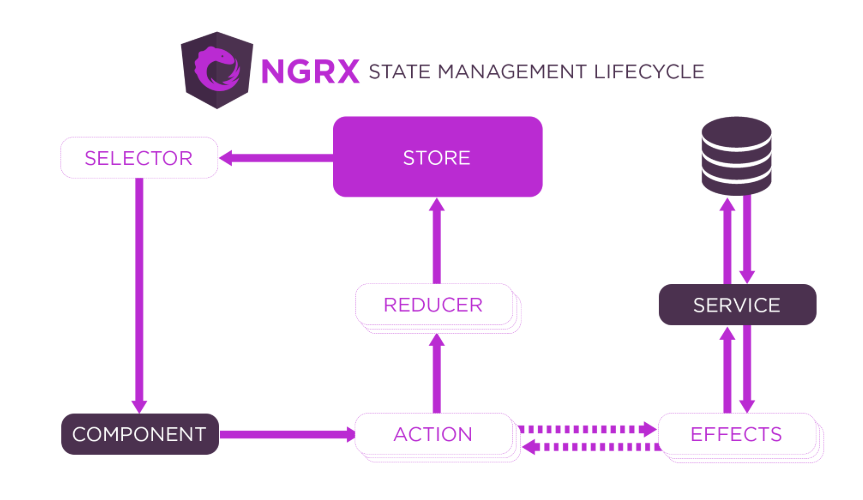
定义初始状态类似于数据库的创建,action 是 store 数据的来源入口,从 NgRx 官网示意图中我们可以看到它可以来自用户操作(component),也可以来自网络请求(effects),reducer 类似于数据表,那 adapter, selector, effects 又分别是什么呢?
ngrx状态管理
按照 Redux 的约定,reducer 必须是纯函数,接收旧状态,返回新状态。adapter 是 reducer 数据表的一行(记录),selector 类似于 sql 中的 select 语句。而 effects 负责传递数据,和一些 DOM 操作,使用 NgRx 这套流程时,component 唯一能做的是 dispatch action, 额外的事情(副作用)就交给 effects 来做。
下面给出代码实例,可以结合代码来理解这段话。
代码实例
初始化 reducer 表
初始状态(initialState)是定义在 reducer 中的,user.state.ts:
 1
 2
 3
 4
 5
 6
 7
 8
 9
10
11
12
13
14
15
16
import { EntityState , createEntityAdapter } from "@ngrx/entity" ;
import { User } from "src/app/models/user.model" ;
export const featureName = "user" ;
export interface State extends EntityState < User > {
needAuth : boolean ;
selectedId? : string ;
error? : any ;
}
export const adapter = createEntityAdapter < User >();
export const initialState : State = adapter . getInitialState ({
needAuth : false ,
});
注册 reducer 表
featureName 是我们的 reducer 表名,根模块注册时,StoreModule.forRoot(featureName, reducer)。 其他模块注册时,StoreModule.forFeature(featureName, reducer), 当在其他模块注册时,仍然需要在根模块配置 StoreModule.forRoot({})。
action 数据源
定义 Action 作为 store 数据来源,props 接收数据参数。
 1
 2
 3
 4
 5
 6
 7
 8
 9
10
11
12
13
14
15
16
17
18
19
import { createAction , props } from "@ngrx/store" ;
import { User } from "src/app/models/user.model" ;
export const login = createAction (
"[Auth Page] User Login" ,
props < { user : Partial < User > } > ()
);
export const loginSuccess = createAction (
"[Auth Page] Login Success" ,
props < { user : User } > ()
);
export const loginFailure = createAction (
"[Auth Page] Login Failure" ,
props < { error : any } > ()
);
export const logout = createAction ( "[Auth Page] User Logut" );
effects 钩子
effects 钩取相应 action(login) 后,发送网络请求,并触发新的 action(loginSuccess 或者 loginFailure)。effects 与 action 数据交互是双向的。
 1
 2
 3
 4
 5
 6
 7
 8
 9
10
11
12
13
14
15
16
@Injectable ()
export class UserEffects {
constructor ( private actions$ : Actions , private authService : AuthService ) {}
login$ = createEffect (() =>
this . actions$ . pipe (
ofType ( UserActions . login ),
concatMap (({ user }) =>
this . authService . login ( user ). pipe (
map (( result ) => UserActions . loginSuccess ({ user : result })),
catchError (( error ) => of ( UserActions . loginFailure ({ error })))
)
)
)
);
}
adapter 记录
action 传递数据给 reducer 表, reducer 表在 loginSuccess 时就增加一行记录。
 1
 2
 3
 4
 5
 6
 7
 8
 9
10
11
12
13
14
15
export const reducer = createReducer (
initialState ,
on ( UserActions . login , ( state ) => {
return { ... state , needAuth : true };
}),
on ( UserActions . loginSuccess , ( state , { user }) => {
return adapter . addOne ( user , { ... state , needAuth : false });
}),
on ( UserActions . loginFailure , ( state , { error }) => {
return { ... state , needAuth : true , error };
}),
on ( UserActions . logout , ( state ) => {
return { ... state , needAuth : true };
})
);
selector 状态切片
我们要将新的状态作用到 component 上,这个时候就需要 selector 在 reducer 中查询,创建 user.selector.ts:
 1
 2
 3
 4
 5
 6
 7
 8
 9
10
11
12
13
14
15
16
17
18
19
const getUserState = createFeatureSelector < State >( featureName );
const { selectEntities } = adapter . getSelectors ();
export const getLogin = createSelector ( getUserState , ( state ) => state . needAuth );
export const getError = createSelector ( getUserState , ( state ) => state . error );
export const getSelectedId = createSelector (
getUserState ,
( state ) => state . selectedId
);
export const getUserEntities = createSelector ( getUserState , selectEntities );
export const getUser = createSelector (
getSelectedId ,
getUserEntities ,
( id , entities ) => ( id ? entities [ id ] : undefined )
);
在 login.component.ts 中得到新的状态:
1
2
error$ = this . store . pipe ( select ( UserSelectors . getError ));
needAuth$ = this . store . pipe ( select ( UserSelectors . getLogin ));
变量中的 $ 表示得到的数据是 Observable 对象。我们可以直接将 Observable 渲染在 html 中:
1
2
3
< mat-error * ngIf = "error$ | async" >
The username and password were not recognised
</ mat-error >
也可以取订阅后的布尔值 error$.subscribe(data => data)。
在 component 中填写完登录表单后, 只需 dispatch action:
1
this . store . dispatch ( UserActions . login ({ user }));
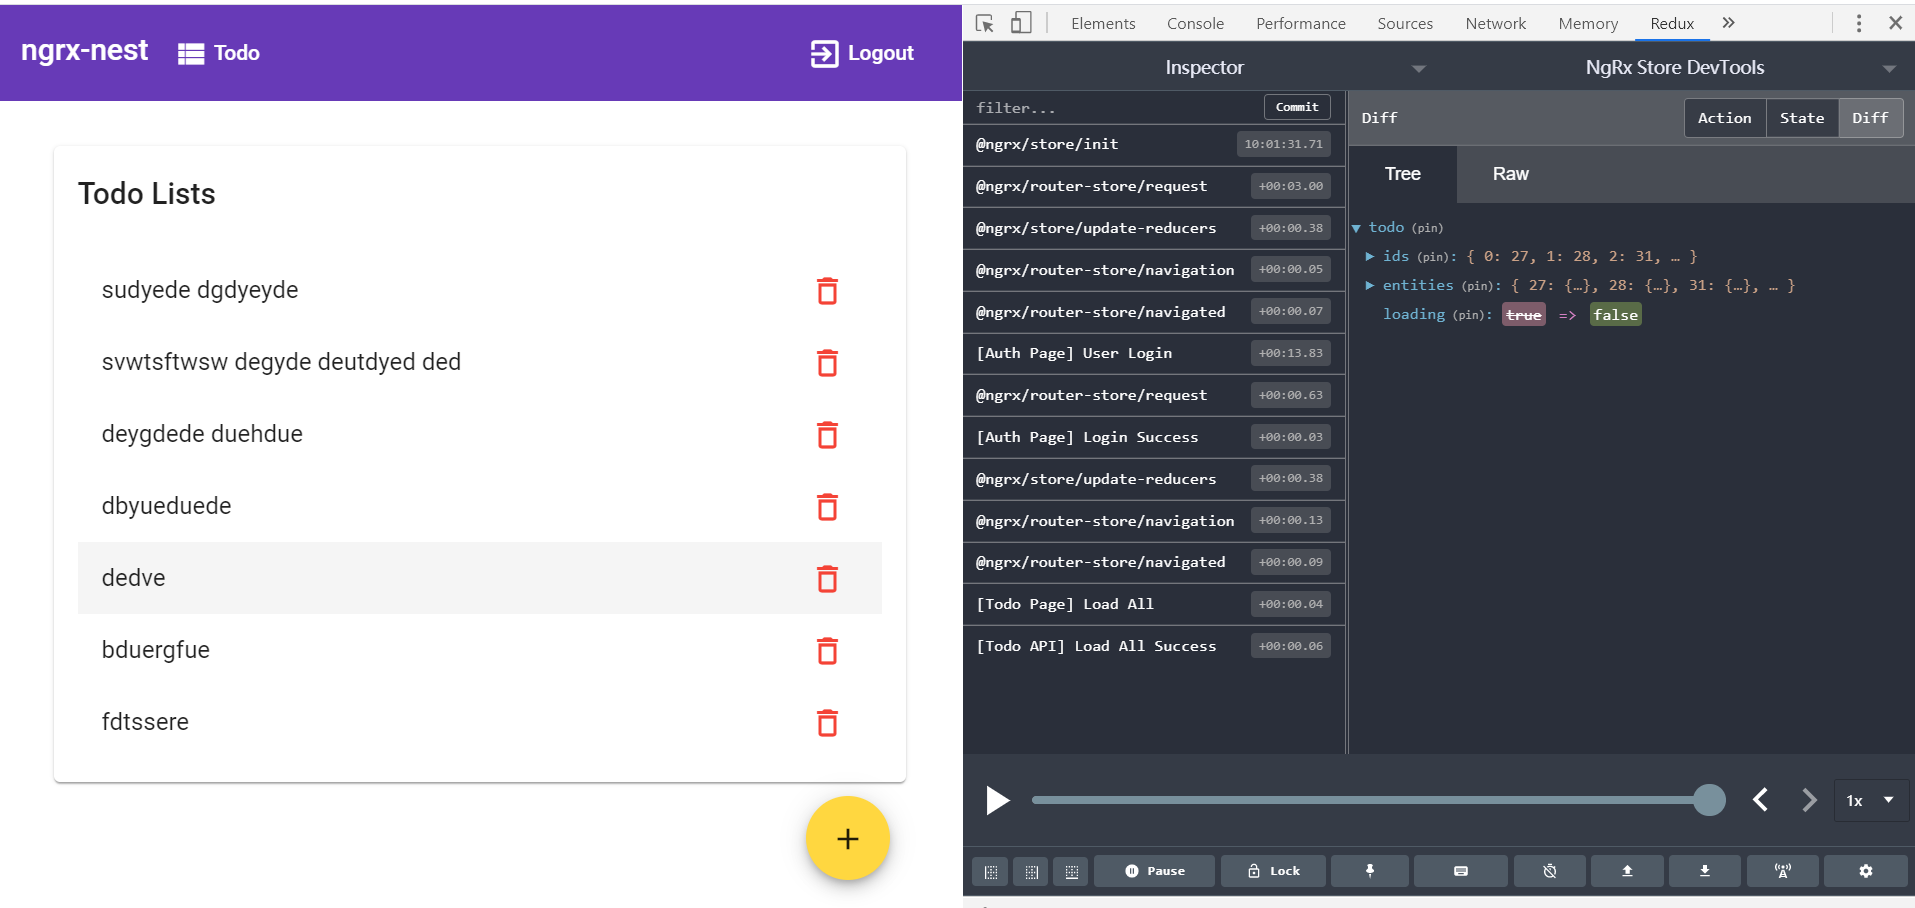
状态数据就在 component, store 之间来回传递。最后的程序如图:
监听页面状态变化
思考
看到这里,你会发现,我们绕了一圈做了一件简单的事。但你可以想象,前端框架的组件化开发方式,组件之间的通信基本都是单向数据流,要是没有状态管理,父子组件还好,相隔很远的组件,只能通过一级一级向上传,再一级一级向下传,会更加麻烦。
如果需要共享的状态较少,可以直接定义在 service 中,通过 DI(依赖注入) 的方式能够很方便地传递到不同的 component 中,并不需要状态管理。
附:源码地址
参阅资料