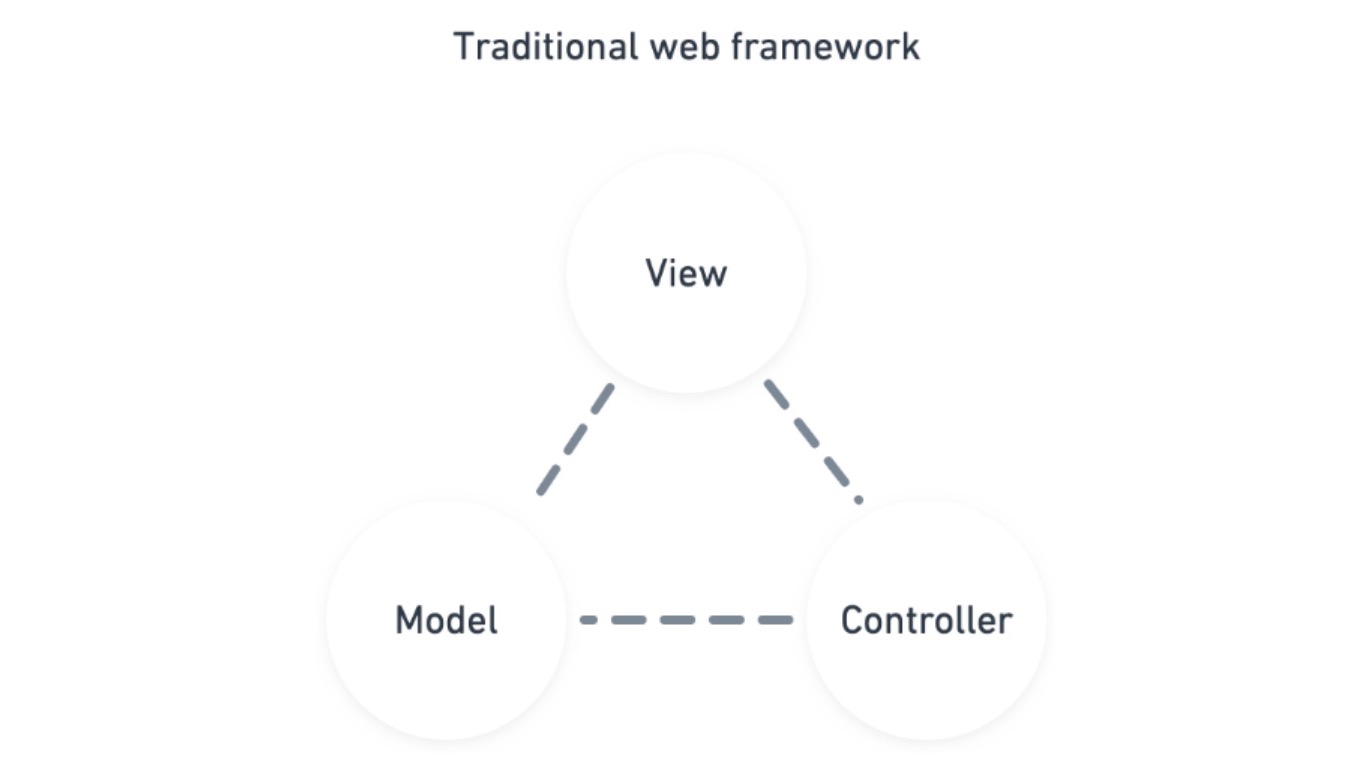
随着代码量的增长传统服务端 MVC 模式中 Modal 和 Controller 会变得含糊不清,导致难于维护。下面是传统 MVC 服务端架构:
传统MVC架构
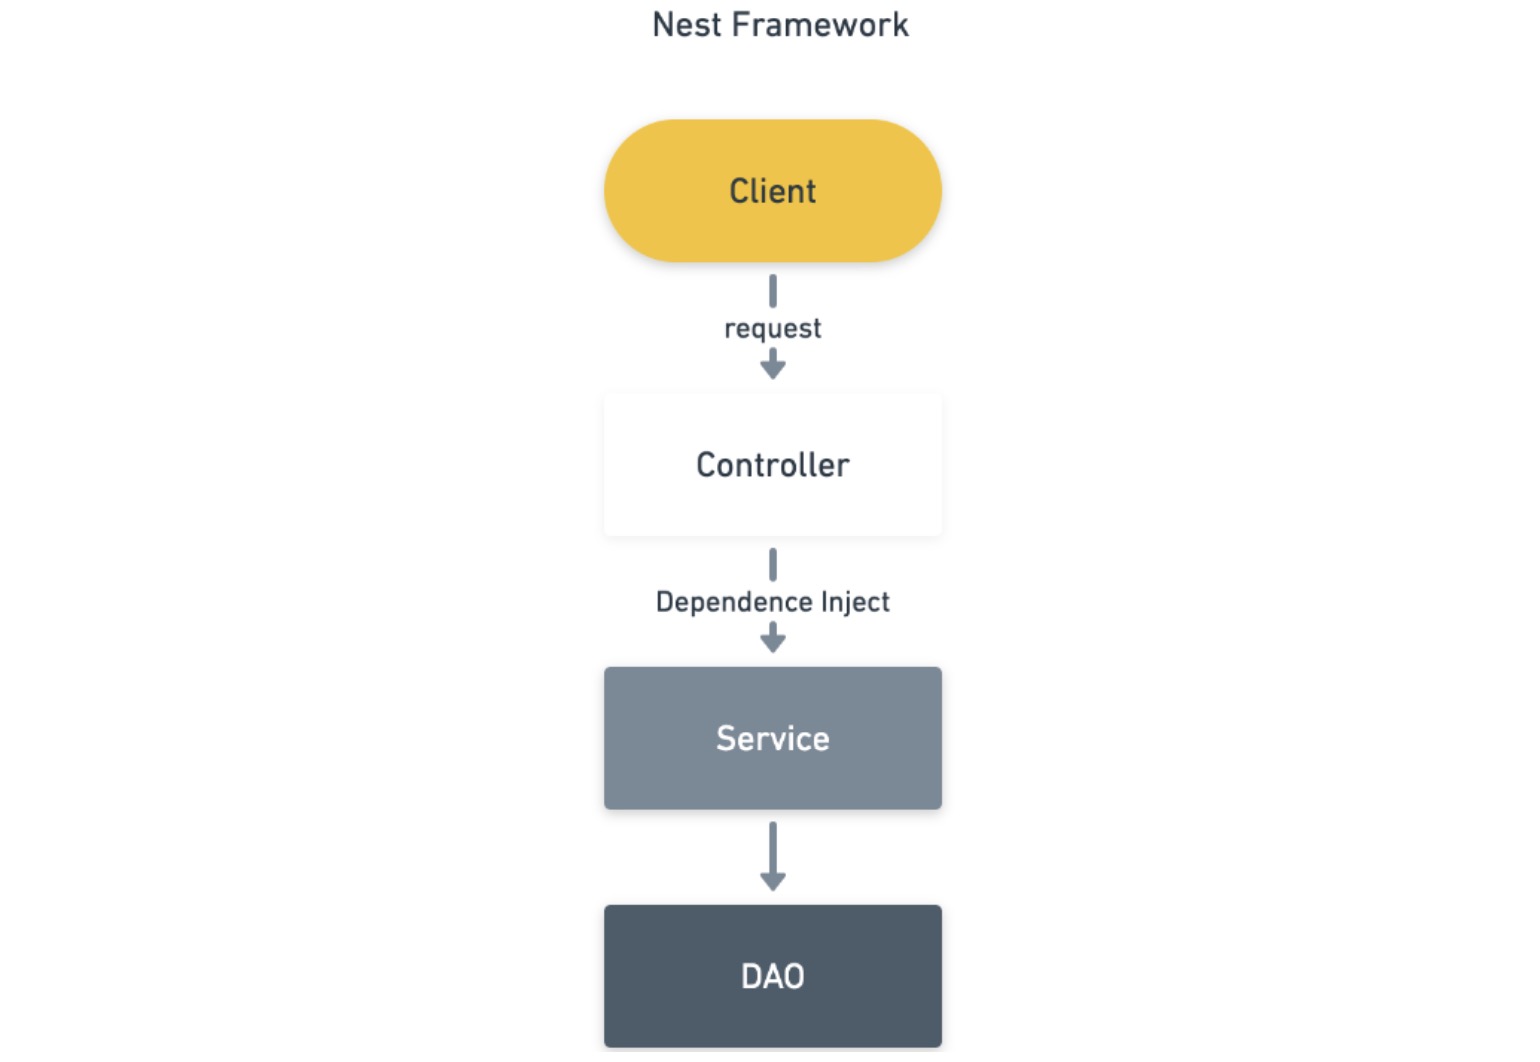
Nest(Nest.js) 的分层借鉴自 Spring,更细化。我们应该要了解整个 Nest 框架的三层结构,Nest 和传统的 MVC 框架的区别在于它更注重于后端部分(控制器、服务与数据)的架构,视图层相对比较独立,完全可以由用户自定义配置。
NestJS三层架构
创建 Nest 项目
$ npm install -g @nest/cli 全局安装 nest 脚手架
$ nest new nest-crud 新建 nest.js 项目, 选择 yarn 作为开发工具
$ nest g mo photo 建立 PhotoModule
$ nest g co photo 建立 PhotoController
$ nest g s photo 建立 PhotoService
$ yarn add @nestjs/typeorm typeorm mysql 需要使用 typeorm, mysql 需要安装这些库
在 TypeORM 中数据库的表对应的就是一个类,通过定义一个类来创建实体。实体(Entity)是一个映射到数据库表的类 (类似于 mongoose 中的 Schema 映射到 MongoDB 的 collection),通过@Entity()来标记。在 photo 文件夹中新建 photo.entity.ts:
 1
 2
 3
 4
 5
 6
 7
 8
 9
10
11
12
13
14
15
16
17
18
19
20
21
22
23
24
// photo.entity.ts
import { Column , Entity , PrimaryGeneratedColumn } from "typeorm" ;
@Entity ( "photo" )
export class PhotoEntity {
@PrimaryGeneratedColumn ()
id : number ;
@Column ({ length : 500 })
name : string ;
@Column ( "text" )
description : string ;
@Column ()
filename : string ;
@Column ( "int" )
views : number ;
@Column ()
isPublished : boolean ;
}
在 app.module.ts 中的 import 数组中配置数据库连接,可以配置多个数据库连接。
 1
 2
 3
 4
 5
 6
 7
 8
 9
10
TypeOrmModule . forRoot ({
type : "mysql" ,
host : "localhost" ,
port : 3306 ,
username : "root" ,
password : "123456" ,
database : "test" ,
entities : [ PhotoEntity ],
synchronize : true ,
});
然后在 photo.mudule.ts 中 import 数组中注册要本模块使用的数据库。这样,我们就可以使用 @InjectRepository() 装饰器将 PhotoRepository 注入到 PhotoService 中
1
imports : [ TypeOrmModule . forFeature ([ PhotoEntity ])];
数据传输对象简称 DTO(Data Transfer Object),是一组需要跨进程或网络边界传输的聚合数据的简单容器。它不应该包含业务逻辑,并将其行为限制为诸如内部一致性检查和基本验证之类的活动。class-validator 可以很方便地验证前端传过来的参数。
 1
 2
 3
 4
 5
 6
 7
 8
 9
10
11
12
13
14
15
16
17
18
19
20
21
22
23
// photo.dto.ts
import { IsString , IsInt , IsBoolean } from "class-validator" ;
export class PhotoDto {
@IsInt ()
readonly id : number ;
@IsString ()
readonly name : string ;
@IsString ()
readonly description : string ;
@IsString ()
readonly filename : string ;
@IsInt ()
readonly views : number ;
@IsBoolean ()
readonly isPublished : boolean ;
}
三层结构
将 PhotoRepository 注入到 PhotoService 中, 写数据库操作的 crud 代码:
 1
 2
 3
 4
 5
 6
 7
 8
 9
10
11
12
13
14
15
16
17
18
19
20
21
22
23
24
25
26
27
@Injectable ()
export class PhotoService {
constructor (
@InjectRepository ( PhotoEntity )
private readonly photoRepository : Repository < PhotoEntity >
) {}
async findAll () : Promise < PhotoEntity [] > {
return this . photoRepository . find ();
}
async create ( photoDto : PhotoDto ) : Promise < PhotoEntity > {
return await this . photoRepository . save ( photoDto );
}
async delete ( id : number ) {
return await this . photoRepository . delete ( id );
}
async update ( photoDto : PhotoDto ) {
return await this . photoRepository . update ( photoDto . id , photoDto );
}
async findOne ( id : number ) : Promise < PhotoEntity > {
return await this . photoRepository . findOne ( id );
}
}
将 PhotoService 注入到 PhotoController 中, 写 api 路由:
 1
 2
 3
 4
 5
 6
 7
 8
 9
10
11
12
13
14
15
16
17
18
19
20
21
22
23
24
25
26
27
28
29
@Controller ( "photo" )
export class PhotoController {
constructor ( private readonly photoService : PhotoService ) {}
@Get ()
findAll () : Promise < PhotoEntity [] > {
return this . photoService . findAll ();
}
@Post ( "create" )
create ( @Body () PhotoDto : PhotoDto ) : Promise < PhotoEntity > {
return this . photoService . create ( PhotoDto );
}
@Delete ( "delete/:id" )
delete ( @Param ( "id" ) id : number ) {
return this . photoService . delete ( id );
}
@Put ( "update/:id" )
update ( @Param ( "id" ) id : number , @Body () PhotoDto : PhotoDto ) {
return this . photoService . update ( PhotoDto );
}
@Get ( ":id" )
findOne ( @Param ( "id" ) id : number ) : Promise < PhotoEntity > {
return this . photoService . findOne ( id );
}
}
接下来在 main.ts 中配置 swagger, 方便我们测试 api
 1
 2
 3
 4
 5
 6
 7
 8
 9
10
11
const app = await NestFactory . create ( AppModule );
const options = new DocumentBuilder ()
. setTitle ( "photo example" )
. setDescription ( "The photo API description" )
. setVersion ( "0.0.1" )
. build ();
const document = SwaggerModule . createDocument ( app , options );
SwaggerModule . setup ( "docs" , app , document );
await app . listen ( 3000 );
$ npm run start 启动 nest 项目, 访问 http://localhost:3000/docs ,到这里基本的 crud 操作已经实现,此时,NestJS 框架的三层结构 已有体现。接下来再完善项目。
AOP 的思想
我们在 PhotoController 的路由请求参数中传入了 DTO, 做了直接的参数校验。传入类型不符合要求时,会直接报错。DTO 中的 class-validator 还需要配合 pipe 才能完成校验功能。新建一个 pipe 捕获异常。$ nest g pi section/validation
 1
 2
 3
 4
 5
 6
 7
 8
 9
10
11
12
13
14
15
16
17
18
19
20
21
@Injectable ()
export class ValidationPipe implements PipeTransform < any > {
async transform ( value , metadata : ArgumentMetadata ) {
const { metatype } = metadata ;
if ( ! metatype || ! this . toValidate ( metatype )) {
return value ;
}
const object = plainToClass ( metatype , value );
const errors = await validate ( object );
if ( errors . length > 0 ) {
const errorMessage = _ . values ( errors [ 0 ]. constraints )[ 0 ];
throw new BadRequestException ( errorMessage );
}
return value ;
}
private toValidate ( metatype ) : boolean {
const types = [ String , Boolean , Number , Array , Object ];
return ! types . find (( type ) => metatype === type );
}
}
有了这一层 pipe 帮助我们校验参数,有效地降低了类的复杂度,提高了可读性和可维护性。我们还可以对正确的请求,异常的请求进行包装,假设返回的格式是这样的:
 1
 2
 3
 4
 5
 6
 7
 8
 9
10
11
12
# 请求失败
{
    status: 1,
    message: string,
}

# 请求成功
{
    status: 0,
    message: '请求成功',
    data: any
}
可以利用 AOP 的思想去做这件事。全局捕获错误的切片层去处理所有的 exception,如果是一个成功的请求,需要把这个返回结果通过一个切片层包装一下。
在 NestJs 中,Exception Filter 是最后捕获 exception 的机会。我们把它作为处理全局错误的切片层。$ nest g f section/errors
 1
 2
 3
 4
 5
 6
 7
 8
 9
10
11
12
13
14
15
16
17
18
19
20
21
22
23
24
25
26
27
28
29
@Catch ()
export class ExceptionsFilter implements ExceptionFilter {
async catch ( exception , host : ArgumentsHost ) {
const ctx = host . switchToHttp ();
const response = ctx . getResponse ();
const request = ctx . getRequest ();
let message = exception . message ;
let isDeepestMessage = false ;
while ( ! isDeepestMessage ) {
isDeepestMessage = ! message . message ;
message = isDeepestMessage ? message : message.message ;
}
const errorResponse = {
message : message || "请求失败" ,
status : 1 ,
};
const status =
exception instanceof HttpException
? exception . getStatus ()
: HttpStatus . INTERNAL_SERVER_ERROR ;
response . status ( status );
response . header ( "Content-Type" , "application/json; charset=utf-8" );
response . send ( errorResponse );
}
}
而 Interceptor 则负责对成功请求结果进行包装:$ new g in section/transform
 1
 2
 3
 4
 5
 6
 7
 8
 9
10
11
12
13
14
15
16
17
18
19
20
21
22
23
interface Response < T > {
data : T ;
}
@Injectable ()
export class TransformInterceptor < T >
implements NestInterceptor < T , Response < T >>
{
intercept (
context : ExecutionContext ,
next : CallHandler
) : Observable < Response < T >> {
return next . handle (). pipe (
map (( rawData ) => {
return {
data : rawData ,
status : 0 ,
message : "请求成功" ,
};
})
);
}
}
将 Interceptor, Exception Filter 和 Pipe 定义在全局范围内:
1
2
3
app . useGlobalFilters ( new ExceptionsFilter ());
app . useGlobalInterceptors ( new TransformInterceptor ());
app . useGlobalPipes ( new ValidationPipe ());
$ npm run start 打开 http://localhost:3000/docs, 测试 api 结果正如我们预期的那样。
附:源码地址
参阅资料